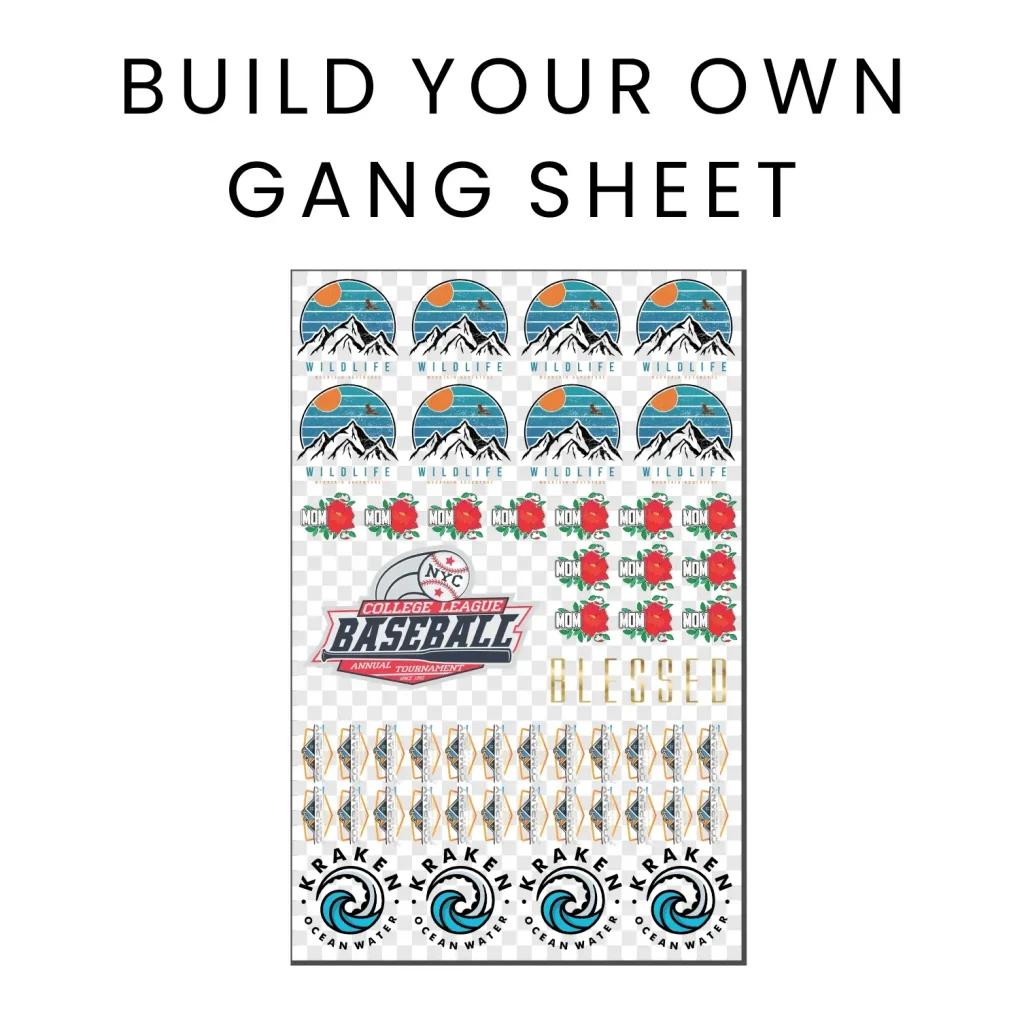
DTF gangsheet builder, also known as DTF gang sheet builder, is the key to turning a single transfer film into multiple, high-impact designs. If you’re new to DTF, this DTF printing gang sheet tutorial will show you a clear, repeatable process to maximize results and minimize waste, with practical setup tips, common mistakes to avoid, starter parameters that you can refine as you gain experience, and a simple preflight checklist to build confidence before production. You’ll learn how to plan, design, print, and post-process a DTF gang sheet, with practical DTF transfer sheet design tips to optimize readability and color. A well-constructed gang sheet consolidates multiple designs onto one print, boosting efficiency for small shops or home studios, and providing a reliable foundation for repeat jobs. Follow the steps here to understand how to create a DTF gang sheet and to apply DTF prep for beginners as you set up your workflow, and establish a repeatable routine you can reuse for different designs and projects over time.
From an LSI-friendly perspective, you can think of this as optimizing multi-design transfer layouts for fabrics rather than chasing a single image. In practice, the concept acts as a layout engine that arranges several artwork blocks on one sheet to speed up production and preserve consistency across garments. Key semantic signals include terms like ‘DTF layout optimization’, ‘batch garment printing’, and ‘transfer sheet composition’ that align with user intent. Whether you call it a gang sheet tool, a batch-print strategy, or a transfer layout editor, the goal remains the same: maximize output while preserving color integrity and edge clarity.
DTF gangsheet builder: A Practical Foundation for Multi-Design Prints
A DTF gangsheet builder is the backbone of a streamlined multi-design print job. By consolidating several designs onto a single transfer film, you reduce setup time, ink usage, and overall production steps. This tool or workflow helps you maximize the printable area while keeping each image legible and centered on the final garment. For beginners and seasoned hobbyists alike, the gangsheet builder translates complex layouts into a repeatable process that scales from one-off orders to small collections.
Getting started with a DTF gangsheet builder means understanding your sheet size, margins, and alignment needs. Use a reliable layout tool or RIP software to arrange designs efficiently, then plan your workflow around a clear print-and-press sequence. If you’re new to this, consult a DTF printing gang sheet tutorial or guide focused on tips for beginners to build confidence as you import assets, set up grids, and refine your color management approach.
Planning Your DTF Gang Sheet: From Size to Margins
Effective gang sheet planning starts before any design touches the sheet. Define sheet dimensions that match your transfer film and printer capabilities, then set a consistent margin and bleed strategy. This early planning helps prevent edge-to-edge bleed issues and ensures clean transfers, especially when trimming or post-processing is involved.
With a grid or structured layout in mind, decide how to place designs for balance and readability. Consider design scaling so each artwork occupies a predictable area across different garment sizes. This planning phase aligns with the idea of DTF prep for beginners, giving you a repeatable template you can reuse for future projects and making it easier to learn how to create a DTF gang sheet.
Designing for a Cohesive Layout: DTF transfer sheet design tips
Designing for a cohesive layout is all about spacing, contrast, and alignment. Use a grid to maintain even margins around each design, and ensure that colors and edges don’t crowd neighboring images. The goal is a clean, legible transfer sheet where every design reads clearly when pressed onto garments.
DTF transfer sheet design tips emphasize keeping a centered vertical alignment, maintaining consistent spacing between designs, and grouping related artwork to create themed collections. Pay attention to color compatibility and edge quality; a strong design plan translates well from screen to transfer film and into finished apparel, reducing the need for rework.
Preparing and Printing: Steps to a Ready-to-Press Gang Sheet
Gather all artwork and confirm final sizes before loading designs into your layout. Standardize color profiles (such as sRGB) to minimize color shifts, then resize and optimize each design for crisp edges at 300 DPI or higher. This preparation aligns with practical tips you’d find in a DTF printing gang sheet tutorial, helping you avoid surprises during production.
Export a print-ready file in a suitable format (TIFF or high-quality PNG is common), and print a test gang sheet to verify alignment, margins, and color fidelity. If you’re following a beginner-friendly workflow, use this stage to confirm your powdering, curing steps, and pressing plan so you can reproduce consistent results across multiple items.
Color Management and Quality Control on Gang Sheets
Color management is essential to ensure that on-garment colors match what you see on screen. Use calibrated monitors, soft proofing, and color profiles to anticipate shifts after transfer. Running controlled test prints helps you refine palettes and minimize costly mistakes when scaling up production.
Quality control should be an ongoing habit: check margin consistency, verify alignment marks, and inspect color accuracy across designs. Keep a simple QC checklist for each gang sheet print to catch issues early, and consider adding automated or semi-automated spacing or alignment aids through your layout tool to maintain reliability.
From Sheet to Shirt: Pressing, Post-Processing, and Error Prevention
With a solid gangsheet prepared, plan your pressing sequence carefully. Determine garment placement, press temperature, and even pressure to ensure uniform results across multiple items. A thoughtful pressing plan reduces misalignment and ghosting while helping you reuse a single gang sheet for several transfers.
Post-press checks are the final safeguard. Inspect each transfer for color shifts, margins, and centering before packaging. By following a repeatable, beginner-friendly workflow and keeping an eye on common mistakes, you’ll develop a reliable process for producing high-quality DTF transfers—and you’ll be well on your way to mastering how to create a DTF gang sheet.
Frequently Asked Questions
What is a DTF gang sheet builder and how does it improve efficiency in DTF printing?
A DTF gang sheet builder is a tool or method for arranging multiple designs on one transfer sheet. It helps optimize the printable area, set consistent margins, and align designs for reliable transfers. Using this builder, you can plan layouts once and print batches, reducing setup time, ink usage, and film waste, which improves efficiency for small shops and home studios.
How to create a DTF gang sheet using a DTF gang sheet builder?
To create a DTF gang sheet with a DTF gang sheet builder, start by gathering all artwork at the intended final size and a single color profile (e.g., sRGB). Choose a sheet size and a grid or layout, then resize each design to its final 300 DPI size and place them on the sheet. Add alignment marks, export a print-ready file (TIFF or high-quality PNG), and run a test print before powdering, curing, and planning the press sequence for production.
What are DTF transfer sheet design tips when planning a gang sheet with a DTF gang sheet builder?
DTF transfer sheet design tips include maintaining consistent margins and spacing, using high-contrast colors for readability, centering designs along a common axis, grouping designs by size, and ensuring text remains legible after transfer. Also apply color management practices such as soft proofing and monitor calibration to anticipate on-garment results.
What is DTF prep for beginners, and how does it guide you before using a DTF gang sheet builder?
DTF prep for beginners covers the essentials before using a gang sheet tool: set up your printer, transfer film, and powder; configure RIP or layout software; establish a reliable color management workflow; prepare artwork at the correct resolution; plan sheet size, margins, and bleed; and run a small test print to validate everything.
Can you follow a DTF printing gang sheet tutorial to learn with a gang sheet builder?
Yes. A DTF printing gang sheet tutorial provides a step-by-step approach to using a gang sheet builder: plan the sheet, arrange designs, resize and optimize at 300 DPI, add alignment marks, save print-ready files, print a test sheet, powder and cure, plan the pressing order, and perform post-press checks to ensure consistency.
What common mistakes to avoid when using the DTF gang sheet builder, and how do DTF transfer sheet design tips help?
Common mistakes include overcrowding designs, inconsistent margins, and failing to account for color shifts. Skipping test prints or neglecting color profiles can ruin transfers. Keep designs organized to prevent file mix-ups and consult DTF transfer sheet design tips to tighten layout, margins, and overall readability.
| Topic | Key Points |
|---|---|
| What is a DTF gang sheet? | A gang sheet is a layout that packages multiple artwork designs onto one large sheet for printing in DTF. The goal is to maximize printable film area while keeping each design legible and centered, enabling multiple transfers from a single sheet. The DTF gangsheet builder is the tool or method used to arrange these designs efficiently, account for margins, and align designs for consistent transfer results. |
| Why use a DTF gang sheet? | – Efficiency: Print multiple designs in one run, reducing setup and idle time. – Consistency: Maintain uniform margins and alignment for bulk orders. – Cost savings: Less waste, lower ink usage, and faster turnarounds. – Versatility: Group related designs into themed sheets for different garments. |
| Tools, Materials, and Prep | – DTF printer with compatible transfer film and powder – RIP software or layout tools to arrange designs – Heat press with stable temperature and even pressure – Design software (Illustrator, Photoshop, or alternatives) – Reliable color management workflow (color profiles, test prints) |
| Planning Your DTF Gang Sheet | – Sheet size: Know transfer film dimensions and printable area (e.g., 12×18″, 16×20″). – Margin and bleed: Leave margins to prevent edge issues. – Design placement: Grid layout or freeform; grid is beginner-friendly. – Design scaling: Use a consistent scale for all designs for balanced transfers. |
| How to Create a DTF Gang Sheet (Step-by-Step) | 1) Gather designs and assets; standardize color profiles (e.g., sRGB). 2) Decide on layout; sketch or arrange designs with spacing. 3) Resize/optimize; ensure 300 DPI for crisp edges. 4) Add alignment marks or grid overlay. 5) Save as print-ready (TIFF or high-quality PNG); keep editable backup. 6) Print a test sheet to check alignment and color. 7) Powder and cure as required. 8) Plan pressing sequence for bulk runs. 9) Do post-press checks for color, alignment, and issues. |
| Design Tips Within a DTF Gang Sheet | – Maintain consistent margins for readability. – Use strong contrast for visibility after transfer. – Center designs along a common axis for balance. – Group by size range and keep margins consistent per group. – Ensure text is legible after transfer. |
| Color Management and Print Quality | – Use color profiles and soft proofing to predict on-garment shifts. – Calibrate monitors to match prints. – Run controlled test prints before full runs. – If possible, print final-size subsets to verify appearance. |
| Common Mistakes and How to Avoid Them | – Overcrowding designs on a sheet. – Inconsistent margins leading to unprofessional results. – Ignoring color shifts from film, powder, and heat. – Skipping test prints; increases waste. – Poor file organization; misplacing designs across sheets. |
| Advanced Tips for the Seasoned Builder | – Dynamic layouts using grid rules and modulo math for varied sizes. – Batch processing with templates for recurring collections. – Visual consistency via a style guide for colors, line weights, and margins. – Automated spacing with plugins or scripts. – Simple QC checklists to ensure reliability. |