DTF transfer process has transformed how designers and garment decorators approach custom prints, delivering a flexible, vibrant alternative to traditional heat-transfer methods and screen printing that opens new possibilities for apparel concepts, branding, and on-demand production. A core part of this method is the DTF transfer steps, which guide you from artwork preparation through printing, curing, and the final garment transfer, helping you maintain consistency across runs, optimize ink usage, reduce waste, and achieve reliable color fidelity across fabrics. If you are moving from concept to wearable art, this guide outlines the full workflow—designing for print, selecting films and powders, calibrating printers, and executing transfers with controlled temperature and pressure to prevent scorching or cracking. You will find practical tips on color management, placement accuracy, and post-press care, all framed by a mindset of efficient prep, proper curing, and robust finishing that ensures vibrancy remains after multiple washes. By following these essentials, beginners and pros alike can build confidence in the process, scale their production, and consistently deliver bold, durable prints that meet customer expectations and support brand storytelling.
From another angle, this same concept is often described as a film-based textile printing workflow or a print-on-film technique, highlighting the film as the carrier that carries artwork before it is bonded to fabric with heat. LSI-friendly terminology includes phrases like film-to-garment transfer, fabric decoration via adhesive-coated film, and direct-to-film printing, which all point to the same core process of translating digital art into durable wearable prints. Understanding these variations helps you speak the same language as suppliers, educators, and clients, while you still follow a consistent path from design to finished garment. Regardless of the label, the practical steps—prepping artwork, choosing the right film, applying adhesive powder, and finishing with a controlled heat press—remain the foundation of reliable results.
DTF transfer process: A Modern Approach to Garment Decoration
The DTF transfer process has revolutionized garment decoration by offering a flexible, vibrant alternative to traditional heat transfers and screen printing. As a modern approach, Direct-To-Film uses a printer, film, adhesive powder, and a heat press to produce bright colors, fine details, and a soft hand feel across cotton, blends, and synthetics. This process sits at the intersection of design and application, enabling fast iteration and reliable results across the full design-to-garment workflow.
Understanding the DTF transfer process helps designers translate concepts into wearable art with repeatable results. By leveraging the design to garment workflow and referencing DTF transfer steps, direct-to-film printing process guidelines, and heat-press considerations, you can establish a practical blueprint that minimizes waste and maximizes color fidelity.
From Design to Garment DTF: Optimizing the Design to Garment Workflow
In the design to garment DTF phase, artwork starts in a vector program for crisp edges or a high-resolution raster image for photos. Your design should consider color management, white underbase, and layering. In DTF, white underbase is crucial for light fabrics and vivid colors on dark fabrics. Proper layering ensures white areas print cleanly beneath other colors.
Files should be sized to the garment area and include clear hooks for placement. A well-prepared design reduces misalignment and minimizes waste during the printing and transfer stages. In this stage, you’re laying the groundwork for the DTF transfer steps that will follow, so clarity, color accuracy, and proper layering are your priorities.
Direct-to-Film Printing Process Essentials: Ink, Film, and Color Management
Printing is where the design truly comes to life. DTF uses a specialized printer with pigment inks designed for film transfer. You’ll print the white underbase first (on some workflows) or as part of a multi-pass process, followed by the color layers. The order and method depend on your printer, ink system, and software. The catch is to ensure proper curing and film handling so the adhesive powder adheres correctly.
Direct-to-film printing process requires balancing color fidelity, print speed, and film durability. The goal is to achieve sharp edges, smooth gradients, and a stable white underbase that makes colors pop against the garment color. Verify ink density and color management, print a test strip, and use a film designed for DTF to prevent curling and ensure even adhesive application.
DTF Transfer Steps: A Practical Guide to Consistent Quality
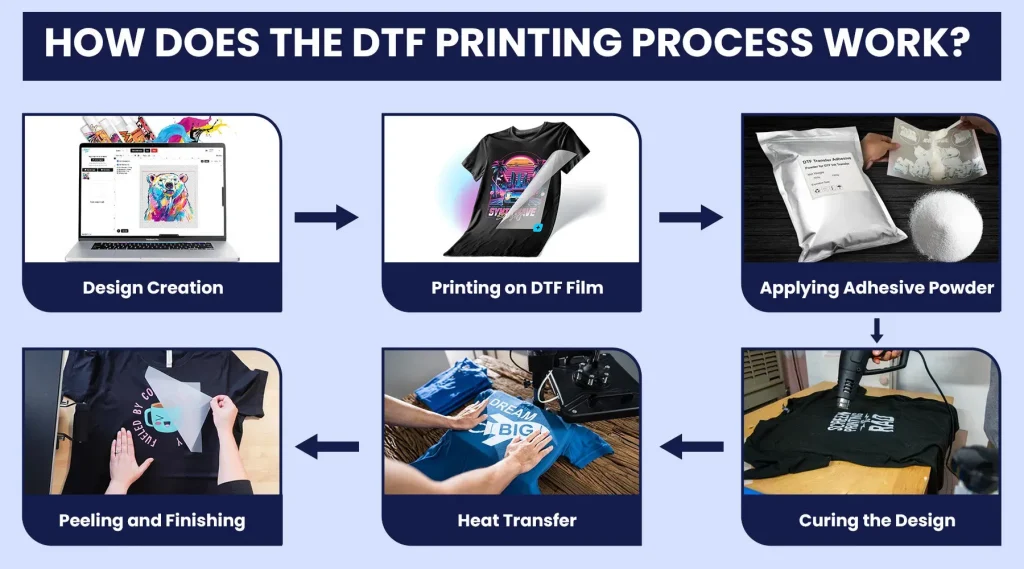
The DTF transfer steps build on the prior phases and include design preparation, film printing, powdering, curing, transfer to garment, and post-press finishing. Each step influences adhesion, color accuracy, and durability, making it essential to follow a disciplined workflow. This sequence highlights how design decisions translate into print performance on fabric.
To achieve consistency, focus on uniform adhesive powder application, rapid and even curing, and precise transfer dwell times. Maintaining clear guidelines for temperature, pressure, and timing—such as matching fabric type and adhesive specs—reduces waste and yields repeatable, high-quality results.
DTF Heat Press Guidelines for Quality Adhesion and Durability
This section highlights the heat press stage, where precision matters most. Pre-press the garment to remove moisture and heat the surface before applying the film. Follow with the aligned transfer, using recommended settings (common ranges around 160–170°C / 320–340°F for 10–20 seconds) and a silicone cover sheet if required by the process. Removing the film while it’s warm or allowing a brief cooldown can impact adhesion and edge sharpness.
DTF heat press guidelines also cover equipment choices, such as an evenly heated platen and adjustable pressure for different fabrics. Consider garment types—from cotton to poly blends—and ensure consistent color transfer by calibrating the press, using a reliable timer, and maintaining proper dwell times. These guidelines help you achieve durable, comfortable prints with a soft hand feel.
DTF Troubleshooting and Finishing: Preventing Defects and Extending Durability
Troubleshooting and finishing are essential for turning a good print into a reliable production standard. Common issues include white underbase gaps, color bleed, or rough texture. Address these by ensuring even powder distribution, sufficient curing, and correct pressure during transfer. Early detection during the finishing phase helps you adjust processes before scaling.
Post-press finishing and care testing are crucial for long-term durability. Perform a wash test on sample garments and establish a QA checklist for each run—check for complete adhesion, edge lifting, and color consistency. Clear customer care instructions—such as machine washing cold and avoiding direct high heat—protect the print and reinforce trust in your DTF workflow.
Frequently Asked Questions
What is the DTF transfer process and why is it popular for apparel decoration?
The DTF transfer process, or Direct-To-Film printing, is a multi-step method that delivers vibrant prints with a soft hand on a wide range of fabrics. It combines a DTF printer, special film, adhesive powder, and heat press to produce durable designs with precise color and detail. Designers and garment decorators favor it for flexibility, easy color management, and quick turnaround compared with traditional heat transfers or screen printing.
What are the main DTF transfer steps from design to garment?
The journey can be summarized in the DTF transfer steps: Step 1 design and file preparation (design to garment DTF); Step 2 film printing setup; Step 3 powdering and curing; Step 4 transfer to garment using DTF heat press guidelines; Step 5 post-press finishing and garment care. Each step focuses on accuracy, curing, and proper handling to ensure a repeatable workflow.
How should I prepare artwork to ensure clean whites and accurate colors in design to garment DTF?
Prepare artwork with proper color management and layering for design to garment DTF. Use CMYK or CMYK plus White profiles and 300 dpi or higher, vector logos for clean edges, and separate white underbase and color layers to prevent color bleeding. Plan white areas carefully so whites print beneath other colors and maintain sharp, vibrant results on both light and dark fabrics.
What are the essential DTF heat press guidelines for a successful transfer?
DTF heat press guidelines emphasize consistent pre-press, correct temperature, time, and pressure. Typical targets are around 160–170°C (320–340°F) for 10–20 seconds, with even pressure and a silicone cover sheet if required. Pre-press to remove moisture, align the film correctly, and decide whether to peel warm or cold based on your process. Proper post-press cooling also aids adhesion and durability.
How do I troubleshoot common DTF issues and finish a transfer for durability?
DTF troubleshooting and finishing focuses on identifying issues like white underbase gaps, color bleed, or rough texture. Remedies include even adhesive powder distribution, adequate curing, and correct transfer pressure. After transfer, perform a finishing step if needed, and run a wash test to ensure durability. Clear post-press checks help you catch and fix problems before production runs.
How can I optimize the DTF transfer process for production scale while maintaining quality?
To scale production, implement a repeatable workflow with standard operating procedures for color separations and pre-press routines, plus a consistent transfer protocol. Regular equipment calibration, a simple QA checklist, and documented settings reduce variability. Focusing on the DTF transfer steps—from design to garment through consistent finishing and care—helps you increase output without sacrificing quality.
| Aspect | Key Points | Notes |
|---|---|---|
| Overview | DTF (Direct-To-Film) is a flexible, vibrant alternative to heat transfer and screen printing; covers design to garment for reliable, repeatable results. | End-to-end workflow from design to garment; supports rapid iteration and fabric versatility. |
| Core Components | Printer with DTF inks, DTF film, adhesive powder, and a heat press; together they enable bright colors, fine details, and a soft hand on diverse fabrics. | Works on cotton, blends, and polyesters. |
| Step 1: Design & File Prep | Use vector for logos or high-res raster for photos; plan white underbase and layering; color profiles (CMYK or CMYK+White); minimum 300 dpi; size artwork to garment area. | Prepare placement hooks and clean layering to minimize misalignment. |
| Step 2: Film Printing Setup | Print order varies; cure and film handling; use test strips; choose film designed for DTF; ensure proper ink density and color management. | Aim for sharp edges, smooth gradients, and consistent underbase coverage. |
| Step 3: Powdering & Curing | Apply uniform adhesive powder; cure the printed film to fuse powder; shake off excess powder before final curing. | Prepare the film for transfer; prevent powder residue on fabric. |
| Step 4: Transfer to Garment | Pre-press the garment; align the film with the printed side toward fabric; apply heat/pressure at recommended settings (e.g., ~160–170°C for 10–20s); peel warm or cold per protocol. | Cool gradually for better adhesion; avoid scorching. |
| Step 5: Post-press Finishing & Care | Optional post-press curing; inspect for edge lift, misalignment, or color issues; perform wash tests. | Provide care guidelines to customers to maximize durability. |
| Materials & Best Practices | Choose high-quality film, adhesive powder, and inks; test garment compatibility; pre-wash/pre-press; implement a QA checklist. | Maintain calibration and brand consistency for repeatable results. |
| Workflow Optimization | Establish SOPs for color separations, pre-press, and transfer; standardize the transfer protocol to reduce variability and improve turnaround. | Scale production with repeatable processes and clear checkpoints. |
| Design to Garment Concept | Represents the end-to-end journey from artwork to finished product; enables fast iteration and high fidelity. | Supports rapid prototyping and scalable production. |
| Practical Tips | Start with small tests; log settings; invest in a good heat press with even temperature; keep equipment clean and calibrated. | Minimize waste and improve consistency. |
| Durability & Care | Well-executed transfers withstand regular wear and washing; provide clear care instructions. | Customer-facing care guidelines help maintain print quality over time. |
Summary
DTF transfer process offers a versatile path from concept to garment, delivering vibrant, durable prints on a wide range of fabrics. By following the design-to-garment workflow outlined above and leveraging the DTF transfer steps, designers can achieve repeatable results with high fidelity, faster turnaround, and easier iteration. Selecting quality materials, maintaining proper curing, and applying consistent heat-press settings are essential. With ongoing practice and quality control, the DTF transfer process can become a reliable core capability for apparel projects, helping you meet customer expectations and scale production.