DTF printing workflow is redefining how designers translate artwork into vibrant, durable apparel. By following the DTF printing steps, you can streamline your DTF transfer process and optimize with a heat press for DTF. This approach also highlights precise DTF printer setup and careful color management to maximize fidelity across fabrics. A focus on standardized steps reduces waste, speeds production, and supports scalable small runs, especially when weighing DTF vs DTG options. Whether you’re new to direct-to-film or upgrading a shop, mastering the DTF printing workflow sets the foundation for consistent, high-quality results.
In other terms, the film-to-fabric transfer sequence describes the digital-to-material journey that starts with artwork and ends with a ready-to-wear garment. This approach is often discussed as the direct-to-film production or film-based transfer workflow, where a printed film is fused to fabric via adhesive powder and heat. Key components include careful color separation, powder application, curing, and a controlled heat press process that yields durable, soft-hand finishes. LSI-friendly terminology such as the direct-to-film process, adhesive powder transfer, and heat-press method helps content reach designers comparing methods to DTG or sublimation. Understanding these related concepts broadens your perspective on apparel customization and helps you craft a production plan that suits both small batches and on-demand orders.
DTF printing workflow: From Artwork to Shirt Mastery
The DTF printing workflow unites digital design with tangible apparel results. From initial concept to final transfer, the process emphasizes color fidelity, consistency, and repeatability to support small businesses and print shops. In this DTF printing workflow, planning, production, and post-care fit together to deliver reliable, high-quality garments.
By following the structured steps—from artwork creation to film printing, powder curing, and heat pressing—you minimize waste and maximize color accuracy. This approach also positions you to compare against alternative methods like DTG, ensuring you choose the right path for your fabric mix and order size while maintaining a scalable, repeatable process.
DTF printing steps: Planning, color management, and preflight accuracy
Effective DTF printing steps begin long before the printer starts. You plan artwork with clean files, set up color management aligned to your DTF printer setup, and preflight for resolution, margins, and bleed. Emphasizing the DTF printing steps such as color separations and profiles helps reduce later adjustments and improve color consistency on textiles.
Consider garment color and material; a white underbase on dark fabrics helps the final image pop. Outline print areas and layer order to ensure the DTF printing steps yield predictable results across different fabrics and print runs, minimizing surprises during production.
DTF transfer process: Film printing, powder adhesion, and transfer dynamics
The DTF transfer process begins with printing the design onto a clear film, using a white ink layer and CMYK as needed. After printing, a precise powder is applied to the adhesive surface to create a bond with fabric during heat pressing. Proper alignment, film handling, and powder distribution are crucial to avoid ghosting and ensure a solid transfer.
Curing the powder and preparing the garment are essential components of the DTF transfer process. After transfer, a cool-down and post-care considerations help maintain color fidelity and durability, contributing to a reliable and repeatable workflow for future orders.
DTF printer setup: equipment checks, ink systems, and calibration
DTF printer setup is the foundation of consistent results. Ensure you’re loading the correct DTF film, using the appropriate ink set (often white plus CMYK or CMYK+White), and aligning the printhead before production. Calibration tests, color profiling, and periodic alignment checks keep colors stable across runs and heat press conditions.
Routine maintenance—cleaning printheads, checking film rollers, and verifying ink density—supports a reliable DTF printer setup. Maintain test strips and documented profiles to speed up production and reduce reprints, ensuring you can scale your operation without sacrificing quality.
DTF vs DTG: comparing fabrics, runs, and cost considerations
DTF vs DTG presents a tradeoff between substrate versatility, run size, and total cost per garment. DTF printing supports a wide fabric range and robust whites for small runs, while DTG excels on 100% cotton with a soft hand-feel but may demand pretreatment and higher per-unit costs on small batches. Understanding these differences helps you choose the optimal workflow for your business.
When evaluating orders, consider fabric blends, color demands, and turnaround times. The DTF vs DTG comparison guides decisions for budget-conscious producers who need reliable, scalable output while maintaining image strength and durability across a range of fabrics and print runs.
Heat press for DTF: temperature, pressure, and timing for durable results
The heat press for DTF must be carefully tuned to the film and powder system. Typical ranges in manufacturer guidelines often fall around 160–180°C, with even pressure and steady dwell time to promote strong bonding and smooth finishes. Fine-tuning pressure and duration reduces edge curling and white underbase show-through, contributing to a clean, durable transfer.
Extra care after pressing includes cooling before handling and advising customers on proper aftercare. Optimizing post-press steps within a standardized heat press workflow helps you deliver durable, professional prints that stand up to washing and wear, while maintaining efficiency across batches.
Frequently Asked Questions
What is the DTF printing workflow and what are its core steps?
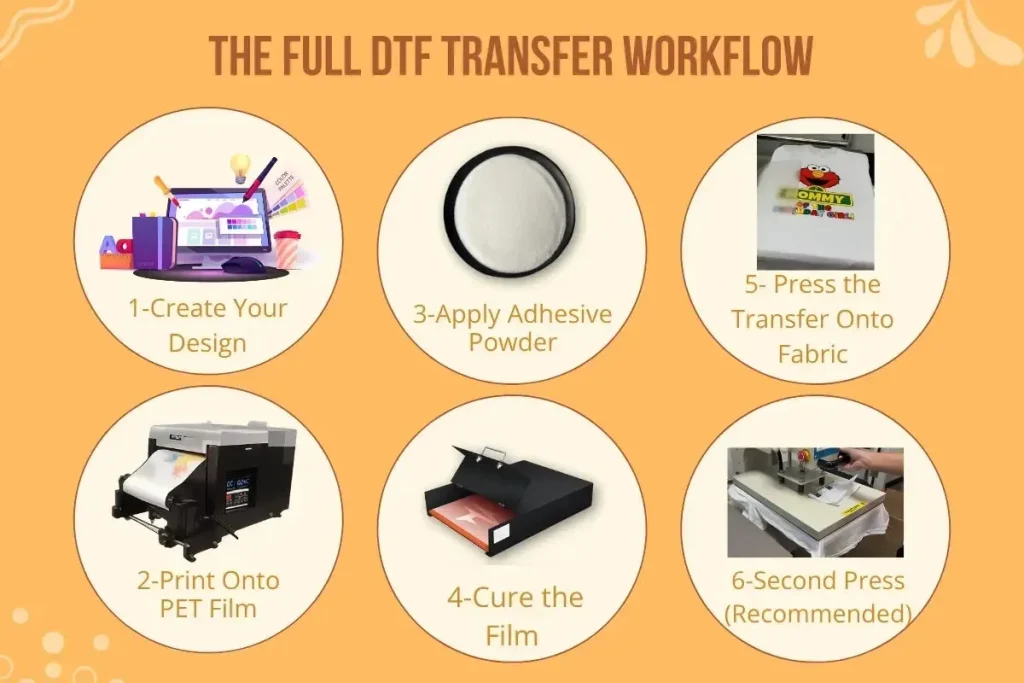
The DTF printing workflow is the end-to-end process from artwork to finished shirt. It typically includes planning artwork and color management, preparing for film printing, printing on DTF film, powder application and curing, transferring the design with a heat press, and final quality checks. Following these DTF printing steps helps ensure color fidelity, durability, and workflow efficiency.
How does the DTF transfer process fit into the DTF printing workflow?
The DTF transfer process is the stage where the printed film is bonded to the garment using heat and pressure. It involves powder adhesion, curing, then heat pressing at recommended temperatures (often around 160–180°C) with even pressure and the correct peel method. Mastery of this step is critical for reliable adhesion and a clean finish.
What should I consider for DTF printer setup within the DTF printing workflow?
DTF printer setup covers ink configuration (white plus CMYK), film type, printhead alignment, color profiling, and regular calibration. Prepare test prints to verify color strength and coverage before production, and ensure the printer is aligned with your film, substrate, and chosen powders. A solid printer setup reduces misprints and speeds up the DTF printing workflow.
DTF vs DTG: How does the DTF printing workflow compare across these methods?
DTF and DTG each have distinct strengths within the DTF printing workflow. DTF offers strong color, bright whites, and compatibility across fabrics with scalable small runs, while DTG excels on 100% cotton with a softer hand-feel but may require pretreatment and higher unit costs for small batches. Your choice should align with substrate variety, run size, and budget to fit the overall workflow.
What role does heat press for DTF play in the workflow and what are best practices?
The heat press for DTF is essential for transferring printed films to fabric. Use manufacturer-recommended temperatures (typically 160–180°C), even pressure, and prescribed dwell times, then perform a cold or warm peel as instructed. Preheat the garment and monitor results to ensure a durable, flat transfer with minimal texture.
What are common issues in the DTF printing steps and how can they be resolved during the DTF transfer process?
Common issues in the DTF printing steps include misalignment, color drift, banding, and weak white underbase. Resolve them by verifying color management and profiles, calibrating the printer, checking film quality, ensuring proper powder application, and adjusting transfer settings in the DTF transfer process.
| Stage | Key Points |
|---|---|
| Planning artwork and color management | Clean design files (300 dpi+), color-managed for the press; choose color profile; plan for dark fabrics with a white underbase; outline print area, layers, and edge details. |
| Preparing the artwork for film printing | Check resolution, bleed, margins; convert text to outlines; ensure true transparency; create color separation plan; run test prints; account for white underbase. |
| Printing on the DTF film and printer setup | Load correct DTF film; set ink (CMYK or CMYK+White); align printhead; calibrate; monitor speed/temperature/ink usage; use test strips; verify solid white areas. |
| Powder application and curing | Apply adhesive powder evenly; let adhere and shake off excess; cure powder with controlled bake; follow manufacturer guidelines; test to dial parameters. |
| Transferring to shirt: heat press and workflow | Prepare shirt; place film face-down; press at 160–180°C; apply even pressure and correct duration; peel (cold/warm) as instructed; optional second press; post-press care. |
| Quality checks and troubleshooting | Inspect white underbase, color accuracy, edge sharpness; ensure transfer is centered; address ghosting/mixups; log profiles, powders, heat press settings for improvement. |
| DTF vs DTG: choosing the right workflow | DTF offers fabric versatility, strong whites, and scalable small runs; DTG offers ultra-soft hand-feel but may need pretreatment and higher per-unit costs. Decide based on substrate, run size, and budget. |
| Maintenance and workflow optimization | Regularly clean printheads/rollers; check powder system; keep platen clean; standardize preflight, storage, and inventory; document processes; use checklists to improve consistency and throughput. |
Summary
Conclusion placeholder