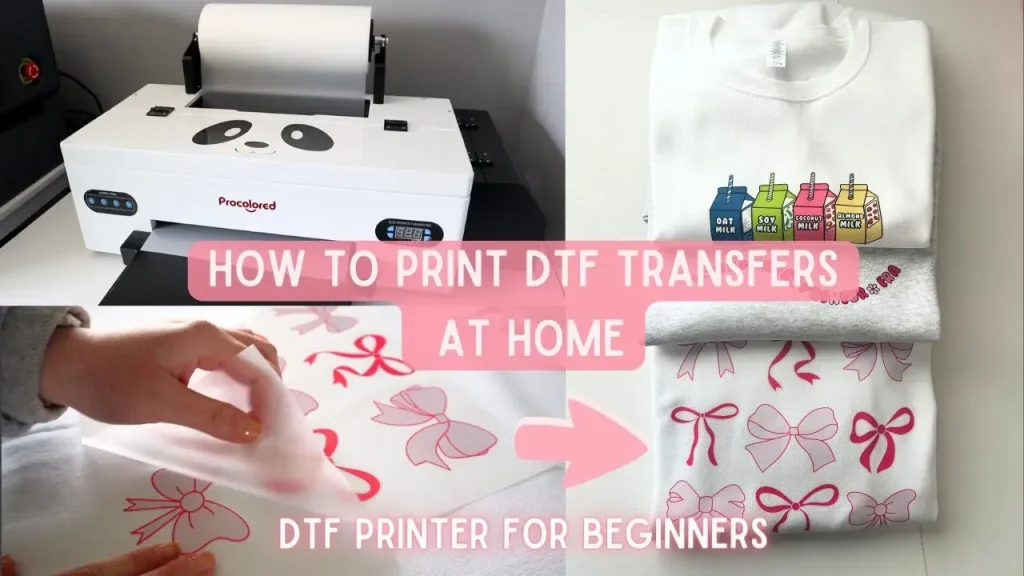
DTF transfers for beginners are transforming how crafters and small businesses decorate apparel and accessories, offering a forgiving entry point that blends vibrant color, durable adhesion, and a streamlined, repeatable workflow you can rely on day after day. If you have felt overwhelmed by jargon after watching tutorials, this guide makes the process approachable by translating technical terms into practical steps through DTF printing for beginners. From choosing the right DTF transfer paper to understanding the powder-bonding stage and the basics of a safe curing routine, you’ll learn a practical, repeatable sequence that minimizes common mistakes. We’ll outline a starter toolkit and a simple, organized workstation so you can print on cotton shirts, tote bags, and other fabrics with confidence, even if you’re starting from scratch. With patient practice and a clear workflow, you’ll move from curiosity to consistent, high-quality results that you can scale into small runs and live production.
In other terms, this is a film-based transfer technique that sits alongside familiar print-on-film workflows and is often described as a direct-to-film method for textiles. Think of it as printing a design onto a specialized film, applying a bonding layer, and then fusing the image to fabric with a heat press, all designed to be approachable for newcomers. LSI-friendly concepts to keep in mind include substrate compatibility, color fidelity, and repeatable process controls, ideas that apply whether you call it direct-to-film, print-on-film, or a bonded-powder transfer. Focusing on a steady setup, accurate temperature, consistent pressure, and simple post-press care helps you build confidence before expanding to multi-color designs or higher-volume runs. As you grow, you can explore refinements like a broader material library and workflow tweaks while keeping the same film-to-fabric concept at the core.
DTF Transfers for Beginners: What It Is and Why It Works
DTF transfers for beginners combine a film-based printing method with a simple powder-and-press workflow, allowing designers to move from concept to wearable prints quickly. In practice, you print your artwork onto a special DTF film, dust it with bonding powder, cure it, and then apply the transfer using a heat press. This setup supports vibrant color, soft hand feel, and compatibility with a broad range of fabrics, making it a practical entry point for small businesses and hobbyists.
Compared to DTG or screen printing, DTF transfers for beginners offer a gentler learning curve and fewer pretreatment steps. The core routine—print, powder, cure, and press—emphasizes repeatable results and straightforward troubleshooting. As you build confidence, you can optimize color accuracy and durability by refining your use of DTF transfer paper, adjusting powder coverage, and dialing in a reliable DTF heat press setup.
DTF Transfer Paper and Film: How to Choose the Right Media
Selecting the right DTF transfer paper and film is foundational. Look for films designed to maximize color transfer and minimize ghosting, and pair them with transfer papers that suit your printer and ink system. The right media affects adhesion, wash durability, and edge crispness, especially when working with diverse fabrics and blends.
Consider compatibility with DTF powder and ink, since film, paper, and powders work together to embed ink into fibers. Tests with sample swatches can help you verify alignment, color density, and transfer reliability before committing to a full run. Your media choice also influences curing time and the stability of the final image during washing.
Tools and Materials Essentials for DTF Printing for Beginners
A well-rounded starter kit helps you stay organized and consistent. Core items include a printer that supports DTF printing, compatible ink, DTF film, and transfer paper. A reliable curing device and a heat press with steady temperature control are also crucial for achieving repeatable results.
You’ll also want DTF powder and ink designed to work together, plus protective gear, lint-free wipes, and a clean workspace. Keeping spare nozzles, mats, and a digital scale on hand helps you measure time, temperature, and pressure accurately, reducing guesswork as you learn the process.
A Beginner-Friendly Workflow: Step-by-Step DTF Heat Press Setup and Process
This section walks through a practical sequence from design to final press. Start with designing or preparing artwork and exporting a print-ready file compatible with your printer’s DTF film. Verifying color density and alignment on test swatches before committing to a product helps prevent costly mistakes.
Next comes printing on the DTF film, applying bonding powder, curing, pre-press, align and press, and then cooling and peeling according to the film’s instructions. Pay attention to a stable DTF heat press setup—consistent temperature, pressure, and time yield repeatable results and minimize common issues like ghosting or misregistration.
Quality Control and Troubleshooting for DTF Transfers
Quality indicators include color saturation that matches the original design, clean edges, and strong adhesion after washing. A smooth fabric surface with no visible powder residue signals a successful transfer and durable print performance.
Common issues for beginners include powder clumps, fading colors after wash, and edge peeling. Solutions involve adjusting powder coverage, ensuring proper curing duration, and fine-tuning heat and pressure during the transfer. Keeping the work area clean and testing with small swatches can help diagnose root causes before running larger orders.
From Learning to Production: Advanced Tips for Improving Results
As you gain experience with DTF printing for beginners, you can start calibrating color using test swatches and color profiles, and document results to build a reliable baseline. Experimenting with different fabrics and ink densities helps you understand how substrates respond to heat and bonding agents, improving consistency across batches.
Scale your operations by maintaining equipment, refining your workflow, and exploring multiple brands of transfer paper, films, and powders. You can also try multi-layer designs and small production runs while maintaining a solid DTF heat press setup and clear post-care guidance for customers.
Frequently Asked Questions
What are DTF transfers for beginners, and what should I buy first?
DTF transfers for beginners are an approachable form of textile printing that prints designs onto a special film, applies a bonding powder, cures it, and then transfers the image to fabric with a heat press. To start, assemble a basic toolkit: a printer compatible with DTF inks, DTF film and transfer paper, bonding powder, a curing method, a heat press with temperature control (a clamshell 15×12 inch unit is common), a weighing scale, and a clean workspace. Learn the starter workflow: design, print on film, powder, cure, pre-press the garment, align and press, then cool and peel as guided by your film.
DTF printing for beginners vs other methods: which should I try first?
DTF printing for beginners tends to be more forgiving than DTG or screen printing. It works on a wider range of fabrics and often doesn’t require pretreatment on light fabrics, while still delivering vibrant color. The results depend on your tools, materials, and setup, so follow practical steps that apply to DTF printing for beginners to build confidence.
How do I choose DTF transfer paper for beginners?
DTF transfer paper plays a key role in the transfer. When choosing, match the paper to your printer and inks, and consider adhesion, wash durability, and color density. Look for reliable options that pair well with your DTF film, then run small tests to compare results and keep notes to guide future purchases.
What is the role of DTF powder and ink in the beginner process?
DTF bonding powder enables the printed design to transfer from film to fabric, while the ink (often a water-based pigment) provides the color. Apply the powder evenly and cure it per the manufacturer’s guidelines, avoiding excess powder to prevent specks. If results vary, recheck powder application, curing duration, and transfer temperature.
What should a beginner’s DTF heat press setup look like and what settings work best?
A reliable heat press with temperature control and even pressure is essential. Start with conservative temperature and time settings and follow the film’s guidelines. A simple clamshell unit around 15×12 inches is usually enough to begin, plus a pre-press step to remove moisture and create a smooth surface for transfer.
Could you outline a simple, repeatable workflow for DTF transfers for beginners from design to finish?
Yes. Start with the design, export for your printer, and print on DTF film. Apply bonding powder, cure the film, perform a pre-press on the garment, then align and press the transfer with appropriate temperature, time, and pressure. Allow cooling and peel as directed by the film, and finish with basic post-care guidance to preserve vibrancy and durability.
| Topic | Key Points |
|---|---|
| What are DTF transfers? | DTF stands for direct-to-film. The design is printed on a special film, bonding powder is applied, the film is cured, and the image is transferred to the final substrate with a heat press. The method works on many fabrics, yields vibrant color, and is beginner-friendly due to a forgiving workflow and approachable equipment. |
| DTF transfers for beginners vs other methods | Compared to DTG or screen printing, DTF is more forgiving in real-use conditions: it tolerates slight color shifts, often requires no pretreatment on light fabrics, and can be easier to troubleshoot for small batches. Quality still depends on tools, materials, and setup. |
| Core tools | Printer and ink system suitable for DTF; DTF film and transfer paper; bonding powder and curing equipment; heat press with reliable temperature control; weighing scale and measurement tools; a clean, organized workspace. |
| Materials to stock | DTF transfer paper and film options; bonding powder; clear/protective coatings; compatible substrates; cleaning supplies and lint-free wipes. |
| Setup basics | Define a dedicated work area, control humidity and dust, create a repeatable workflow (design → print → powder → cure → press), and prioritize safety (gloves, ventilation). |
| Step-by-step workflow (beginner-friendly) | 1) Prepare the design 2) Print on DTF film 3) Apply bonding powder 4) Cure the powder 5) Pre-press the garment 6) Align and press 7) Cool and peel 8) Post-care guidance. |
| Quality control | Check color saturation, clean edges, firm adhesion after wash, and a smooth garment surface with no powder residue. Revisit powder application, curing time, and temperature if issues arise. |
| Troubleshooting | Powder clumps or uneven coverage; fading colors after wash; peeling or poor adhesion; sticky prints. Fixes include re-sifting powder, verifying curing and temperature, using fresh transfer materials, and adjusting pre-press steps. |
| Advanced tips | Calibrate color with test swatches, optimize substrate choices, maintain equipment, try different brands, and use a simple test matrix to build baseline results before larger runs. |
| Why this approach works for beginners | DTF transfers for beginners offer a flexible, forgiving entry into textile decorating. A modest setup and a focused workflow help learners build confidence, grow consistency, and scale up gradually as skills improve. |